Publishing Photos: From Concept to Realization
MOD
SETTING PERSONAL GOALS:
As a photographer, we always hope to one day achieve accolades in some way or another. Publishing photos is one way to get the recognition you want. Therefore, one of my goals this year was to be published more. In 2015, I was published and I kind of got the 'bug' if you will. So, in 2016 & 2017 I started to spin my portfolio towards a more commercial & editorial standard I had not done before.Now, in 2018 I've been published about 20 times just this year! I cannot believe it!
CONCEPT:
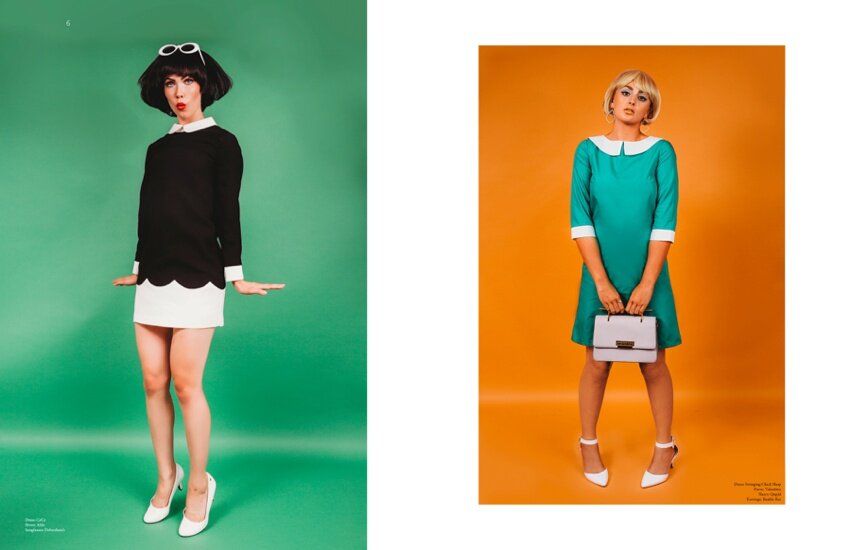
Back in 2016 (yes 2016) I thought hmmm wouldn't it be fun to do a Twiggy-inspired MOD shoot? The 60's remain a constant inspiration to me, I love MOD lifestyle, haircuts, fashion and culture. It always intrigued me. But 2016 proved to be a rather busy year for me, I got married (TWICE... to the same man) once in Iceland & once here in the states! I expanded my work and made some real life changes. So in 2017, I started to conceptualize what kind of colors and silhouettes I wanted.I love the Pea Green that was popular then and the Peptobismal Pink! I knew I wanted those colors so I started researching old ads from the sixties and created mood boards on Pinterest.
RESEARCH:
More goes into an editorial shoot than one thinks, especially when you are publishing photos. From editing styles to finding the right team. For instance, I researched often used photo angles and posing from the vintage ads I found. Also, I looked up popular makeup looks and hairstyles of the time. Since I am also a Wardrobe Stylist I started searching for vintage and vintage-inspired clothing and accessories. To compile this research I used Pinterest, which also allowed me to share ideas with the team I chose. Check out the Mod Shoot Board Here!
CREATING THE TEAM:
Finding the right team of stylists, artists and models is so incredibly important when you're putting together a shoot for publication. Often, it can take quite some time to find who you want to work with and coordinate all the right people's schedules. But believe it or not, it all started with an adorable dog named Pearl!My groomer's Dana & Alex of A Purrfect Groomer Mobile Pet Salon allowed me to use their parrot Buster a few years ago for another published shoot and they mentioned they had a tiny white poodle they would be ok with safely dying any color for a photoshoot! From there, I realized she would be PERFECT for the 60's inspired look I was imagining. As a result, off I went to find the perfect models and HMUA team.Heather Grabin, whom I met on a shoot in 2014, has now become my own hairstylist and frequent collaborator on photoshoots. It was a no-brainer for me that she was the right girl to pull off these Retro-Inspired Hairdo's using both the models hair and sets of natural hair wigs to make show of those popular bobs from the 60's. Sara Garcia Makeup Artistry is also a frequent collaborator whom I met in 2015. She is so great at pulling off every makeup style I come up with. We met in 2015, and she is my go-to gal for high-end polished looks that are to die for! When searching for models, I had worked with Kayleigh, a senior in high school, on a separate shoot and I know this amazing girl could pull off the 'Twiggy" look I was aspiring for, and Olga looks like she walked straight off of the set of a 60's James Bond Movie. Both girls were perfect casting for this inspo.
BUILDING THE SET:
I wanted a lot of options. Pinks, Greens, Oranges... Colors that SCREAMED 1965! So I used Savage Seamless Paper Backdrops in Holly & Marmalade. But I also set out to do something I hadn't done before. Build a semi-permanent set for my backyard. Since this session, I've already reused it 5-6 times over the course of a few months and I absolutely LOVE it.I used 2 4ft x 8ft plywood and used piano hinges to make it sort of like a sturdier V-Flat, I also grabbed another 4ft x 8ft plywood piece and had Home Depot cut it in half to create the 4x4 base "flooring" and bought 3 pieces of lightweight luan board (eucaboard would work too) to paint so I could easily switch out the sets and attach the luan to the plywood with backdrop clamps. It was a bit of an undertaking at first, but now it's fairly easy to paint the luan for new sets and they turn out amazing. I have used foam insulation to create flower and leaf walls on my plywood 'v-flat' set for other shoots too. Check out the results below:

THE DAY OF THE SHOOT:
Shoot days usually start quite early. From last-minute wardrobe tweaks to hair and makeup. It's important to create a call sheet and schedule on days like this or it can get quite hectic.I typically organize my looks and accessories together and have special color-coded boxes for the jewelry and tags for each models outfit. It makes it easier for assistants or other people involved to grab things for you if you are busy elsewhere either shooting or switching out sets. Organization and prep makes my life so much easier and it's always noticed by clients and collaborators. If you have a professional looking call sheet, schedule, and studio people really appreciate it. It also clears my mind to just shoot better! If I'm worried about one model not having an outfit ready while I'm trying to photograph the other model, I may miss some shots I originally intended to get. If I can impart even a small bit of photographer wisdom, it's that Prep is KEY!Here is some BEHIND THE SCENES shots of the set, and all the people involved.


AND HERE ARE SOME EXTRAS:
Even though these images weren't published, I wanted to share them so you can see a little more into what shots I got that day


 THANKS ALL!XOXO,LACEY